🧰 How I use Cal.com as a Consultant
Warning to people with client-based businesses: This is a game changer.
If you’ve done any client work, you know how painful it is to book meetings. There’s so much back-and-forth to find a time. And then, when you do schedule a call, you have to start worrying about how to make sure your client remembers to pay.
Platforms like Clarity help manage payment but also take a 15% cut. And there’s still a lot of back-and-forth to book a meeting because potential clients suggest three meeting times without seeing your availability first.
Fortunately, I discovered the perfect product for managing client bookings. It makes the whole process seamless.
Today, I’ll show you exactly how I use Cal.com to run my consulting business on autopilot.
Welcome to another edition of Really Good Business Ideas. This week’s article is a reader request! We were chatting about all the awkward back-and-forth with new clients, and I mentioned they could eliminate a lot of that by using a calendar booking link with payment built-in. It would be easier for them and their client. They politely told me they had no idea what I was talking about or how I could make it sound so easy.
As frequently happens (to all of us, I suspect), it was a good reminder that the things that come easy to me don’t come easy to everyone else. Sometimes the simplest solutions are the most important ones to share!
By the way, you, too, can suggest a topic! I check my digital suggestion box every week.
Cal.com is a web tool that helps you build processes around your calendar events.
Here are a few of the reasons why I love it:
It’s free for solopreneurs. You won’t need a paid plan unless you want to onboard an entire team.
It’s simple to set up and easy to use.
It integrates with multiple video call tools, so you can use the one you prefer. I suggest Google Meet!
It integrates with payment platforms like Stripe to collect payment before clients finalize their booking. Don’t worry—free meetings are also an option.
It can check multiple calendars to determine availability. For example, I also have it check the calendar link from my PT clinic in case I forget to add one of my appointments to my personal calendar.
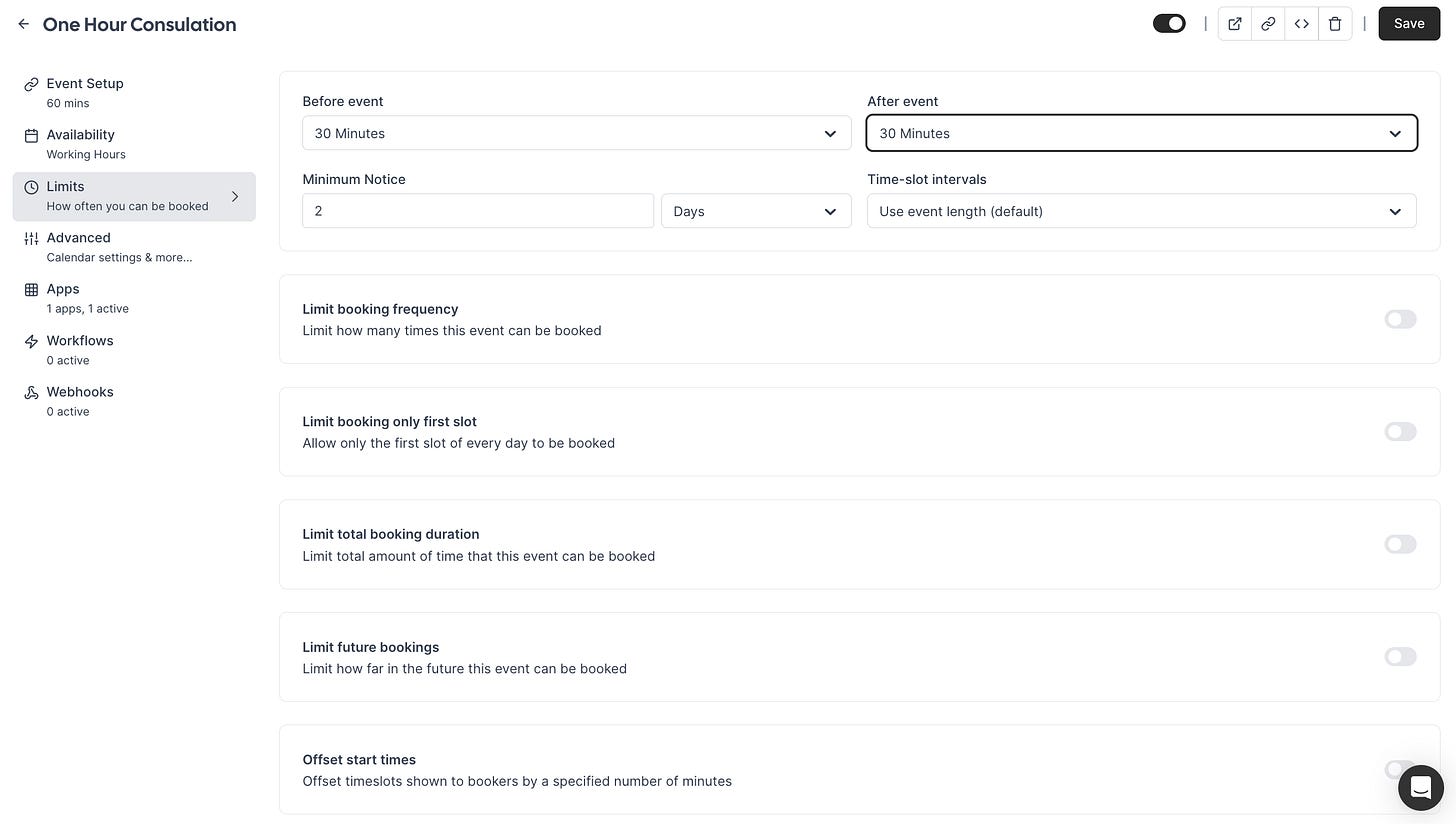
It enables granular schedule control with settings for buffers between meetings, the number of meetings that can be booked, and the lead time required before a new booking.
It’s easy to update working hours and block out availability while on vacation.
Clients can self-serve when they need to cancel or reschedule their bookings.
It sends automatic emails to keep you updated on new bookings.
Four Ways I Use Cal.com
Here are a few examples of how I use Cal.com.
One Hour Consultations
Payment, scheduling, and delivery.
While I no longer do retainer-based client work, I am available for ad hoc consultations. People book calls with me to discuss their company’s growth, work on solving a problem together, get advice on strategy, and more.
This entire process is managed automatically by Cal.com. When someone wants to book a consultation with me, they click the booking link on my website which takes them to a Cal.com link that enables them to find a time, pay, and book. I already know I'll be available because Cal.com automatically checks my calendars and booking settings first.
When someone books a consultation, the event is added to my calendar. I’ll also receive an email about it, including any additional information I requested on the booking page. Because of my meeting buffer settings, I’ll have a block of time before the call for review and after the call to create a summary.
Business Opportunity Analysis
Payment, kickoff call, and timeline management.
Another way people can hire me directly is for a business opportunity analysis. Most of this work is done independently before I deliver the finished analysis. However, I like to do a quick kickoff call because it’s the fastest way of capturing exactly what the client needs before I get to work.
This booking link doubles as an easy way to collect payment. Like consultation calls, potential clients can find the booking link on my website to schedule a kickoff call and make the payment.
Really Good Business Ideas Office Hours
Self-serve bookings with restrictions.
One of the perks I offer paid subscribers here is the option to book office hours appointments with me. These can be used for things like quick feedback or help getting unstuck. Trying to manage these bookings by email would be a nightmare. There would be so much back-and-forth for scheduling, and I’d have to track how often people book on my own.
Instead, paid subscribers can access a page with details about the office hours and a Cal.com link for booking. They can find a time that works for them, while Cal.com automatically tracks how often people book and enforces the limit of 4 appointments per year.
Ad Hoc Coffee Chats
Easy booking without the need for back-and-forth.
Sometimes, we just want to catch up with a professional acquaintance, or we get introduced to someone interesting and want to have an informal coffee chat. Cal.com is great for these situations, too.
I have an Event Type set up for this exact scenario. When someone reaches out to catch up or agrees to hop on a call with me, I just share my event link. It doesn’t require payment and enables the person with the link to find a 30-minute slot that works for them.
How to Set Up Your Cal.com Account
You’ll only need to set up your Cal.com account once, and it’ll be easy to maintain after that. Let’s go over the most important steps.
1. Sign Up for Cal.com
The first step is to create your Cal.com account. If you use Google Calendar, I recommend signing up with your Google account by clicking the Google button on the bottom left.
Once you’ve created your account, you’ll be guided through the onboarding process.
First, reserve your URL, make sure your name is correct, and select your timezone.
Next, you’ll connect your calendar(s).
After that, you’ll connect your preferred video app(s).
Then, you’ll set your working hours. Note these are just default hours. Nothing can be booked outside of working hours, but you can override them on specific days or for specific Event Types.
Finally, you’ll add your profile photo and a short bio. This will appear on your public profile URL and will add an air of professionalism.
2. Connect a Payment App
Now that your account is created, the next step is to connect to a payment app.
A payment processor will enable you to charge clients directly on Cal.com when they book. There are currently three payment processor options. I use Stripe, but it may be easier to start with PayPal if you don’t have a Stripe account.
3. Create Your Event Types
Now it’s time to create your Event Types. Create one for each type of meeting you anticipate booking, including different meeting lengths, and whether they require payment or not.
First, navigate to Event Types in the top left. There will already be some default event types set up for you. You can keep these events, modify them, or delete them.
To create a new Event Type, click New at the top right. Then, name your event, customize its URL, add a description, and select the meeting length.
Click Continue to access additional settings including:
Whether or not the Event Type is visible on your public profile URL.
Which video tool you want to use (in-person locations are also an option).
Specific availability for this event type that should override your default availability.
If it should be a recurring event.
You can also use your Limit settings to choose how often the event type can be booked, how far in advance it needs to be booked, and how much buffer time you want between bookings.
Finally, to add payment, you’ll need to click on Apps and set your price, currency, and when to collect payment. You may also want to check out the other apps to see if any would be useful. For example, you can use an app to generate a QR code for bookings that you could print for an in-person event.
Repeat this process for any standard Event Types you want to prepare. To share an event, click to copy the URL on the Event Setup page.
You can use your Event Type links on your website, in emails, and anywhere you want to promote your services or encourage someone to make a booking.
4. Verify Your Profile Page
Once your Event Types are all created, you’re almost ready to launch! The last thing you’ll want to do is check your Profile and ensure it looks how you expect. If you can’t remember your personal URL, click My Profile to see it.
Then, you can visit your URL to ensure everything looks good. It should have your name, profile photo, bio, and a list of the events that you want publicly accessible. Here’s what my public profile URL looks like.
If any events are missing, or if any private Event Types are showing up that should not be, you can go back to your Event Types page and use the Hidden toggle to fix the problem.
After your account is set up, you can pretty much let it run on autopilot. Just make sure you update your availability when you don’t want bookings. When I book travel or any full-day commitment, I add an override to prevent unexpected bookings that day.
Now you’re all set! You can focus on other parts of your business and let client bookings and calendar management run on autopilot.
Thanks again for being here. Don’t forget you can suggest a topic at any time. The Suggestion Box is always accessible on the homepage sidebar.
Back next week with a brand new topic!
To endless possibilities,
Casandra
PS. If you found this useful, please tap the ❤️ below. It helps me out a lot!


Great take Casandra, thank you!
So far only heard people using Calendly ... curious now on the pros and cons of Calendly and Cal.
Have a great day!
I cant figure out how to make an event open for booking only between certain date ranges.